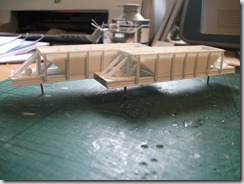
looking good, eh?
A 009 narrow gauge model railway of Rhyd Ddu. The project was born in late 2005. This blog describes the planning, woodwork, track laying, wiring, DCC, scenery, locomotive and rolling stock. The layout is an impression of the Welsh Highland Railway (WHR) Rhyd Ddu station and Tro Ffridd reverse curves. 009 is 4mm scale (OO) narrow gauge using N gauge track.
Last night I sorted through my collection of seated people, putting them into colour order. I found I had 110 people for an initial tranche of 35 carriages. Even so some of these are much smaller (bugs) so it is the equivalent of 30 bogie cars. That’s just 3.67 people per carriage – no where near enough. Thus 200 extras have been ordered via ebay, giving me a new average of 10.34 per car, much better.
I have a few items on ebay at the moment:
http://shop.ebay.co.uk/colinlea009/m.html?_nkw=&_armrs=1&_from=&_ipg=&_trksid=p4340
FR cars 110,111,114 and 22/26 plus kits for the FR short bowsiders and the NWNGR/WHR Gladstone(tourist) car.
The reasons for selling are: 110 – I hate the design of this car, 111 – I would need to put in a lot of work on the driving compartment and have enough brake vehicles now with 100/102, 114 – has recently been slightly altered adding a window to the design, 22/26 is surplus to requirements, I prefer the worsley brass to langley on the bows and the gladstone’s footboards are just waiting to be knocked off regularly!
After considering colours and trying to avoid enamels wherever possible I have concluded that:
- Brunswick green is too dark and I will probably use humbrol acrylic RC409 (supposedly malachite green) with a little black to darken it slightly for the Col Stephens and WHR green
- the brick red ends can be created from railmatch 2404 (light rust) with a little extra red (vermillion) added
- humbrol rc415 is apparently pullman umber but is way too dark, but I reckon with some cream added to it, we could get close. The cream is easy – 416.
- BR crimson (railmatch) remains my paint of choice for the FR/WHR ‘mercedes’ red.
- humbrol crimson lake (403) is fine but could need a little extra brown in it.
- the maroon used for car 24 may well end up being humbrol 423 (carmine) as it is much darker than the humbrol list depicts.
all of these will be airbushed with tamiya acrylic spray thinner (50:50) used (less surface tension than water).
Monday was the first of a couple of mega spray painting days…
Prior to my visit Dad had moved things on by spraying black onto the chassis of 2040-5, 2090, 2010, 2020/1, 2115, 2100 and the combination car. Dad had also found that the rain strips on the roof of the Romanian carriage (2060) had come loose and had replaced them with soldered phosphor bronze wire. This is obviously much stronger than the previous attempt at melting plastic strip onto the brass with mek pak.
The result of the day was:
Truss rods were finished on a number of vehicles and removed from the summer cars as there is conflicting evidence as to whether they had truss rods, certainly the drawing in Boyd shows them without. Also they are pretty much impossible to see when running anyway.
Primer/black where appropriate: 26, 2060, 1000, 119, 120, buffet, ash corridor 25, 2 x NWNGR summer cars, 2 x Pickering brakes, No.1 NWNGR brake, 2 FR bugs plus zoo car
WHR summer car No. 24 had its seats painted natural wood and lamp tops added on. This is a kit bash of a Vale of Rheidol coach and so does not require priming.
Ivory for the window frames was then sprayed onto: 101, 113, 119, 120, 26, 2060, combination car, 2040-5, 2090, 2010. We only masked the roofs off for this, as the red livery will then be over painted.
On two carriages we left the ivory to be hand painted as there was very little to paint: 2020/1.
As a bit of fun the flying bench was primed and then sprayed in railmatch red.
2100 had its body sprayed with precision paints blackberry black although this will require another coat at least.
Afterwards all the chassis were taken back home and will be hand painted inside with acrylics and seated people will be added. Also they will have their bogies and couplings added/reattached.
The new colour of 2115 may cause some trouble as the lighter brown shade chosen is very different to the normal pullman umber. I will have to consider options here. We also need a good paint for the the Colonel Stephens era brick red (used on ends and footboards). At the moment it looks like humbrol brick red with some extra red added might be an option. The humbrol spray brunswick green I have looks too dark.
Roofs will be hand painted in various shades of off white, grey and black.
Prior to painting we have revised our methods and the previous method of vim cleaning is now replaced with a brush on product called Model clean from JLTRT which is well good. Brush it on, let it dry and then wash off with water and it cleans, neutralises and degreases.
Funny moment of the day came when I was spraying with the obligatory mask on. I was trying to talk at the same time and Dad said I was harder to understand that Emmanuel Adebayor on world cup match of the day!
All insides are now back home for red painting and for the addition of seated people.
Below are some images of the scale of the operation:
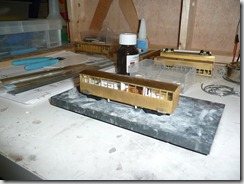
Have been playing around with truss rods. My chosen method being 0.45mm wire bent and soldered into place. The vertical supports are then made up in evergreen plastic strip. It looks fine and is certainly pretty durable. Above is the buffet car. The others include a Pickering brake, two NWNGR summer cars and the Ashbury corridor 25, which are all coming along well.
Dr Ben’s NWNGR Workmens car has had its roof removed so that I can fit in seating and the single partition. This carriage needs a touch up and the roof replacing, but is otherwise finished.
and in other news, I have taken up my friend Rob Waller’s offer of a couple of his wonderful plastic creations – namely two ex SAR ballast wagons. His blog at http://bronhebog.blogspot.com has recently been detailing the construction (scratch building) of these wagons and what beauties they are! This is great news as they are pretty key features for the layout, given that they are mostly stabled in the Rhyd Ddu yard! I had been hoping to convert some ex 3mm scale hoppers, but Rob’s models will ensure the models are far more realistic.
Little chance to do much modelling over the weekend as the new kitchen took up most of my time. The end is in sight for that project though!
Mostly I’m been preparing stuff for Monday’s super painting session. Vale of Ffestiniog had unfortunately had its roof put on the wrong way around meaning the exhaust holes were in the wrong place. After careful consideration I decided that to unsolder the roof would likely mean that the roof would not look as tidy when reaffixed and it could be potentially damaging to other bits too. Thus I have filled the holes and will drill and square up some apertures in the correct place.
I own two Pickering brakes – the first (below in brass) was bought second hand but had to be stripped and rebuilt so frankly I may as well have bought the kit new(!). It has now had its lamp tops added. The small amount of superglue that is shown up by the flash on my camera will be cleaned up once dry.
The other Pickering was ‘inherited’ from the late Dr Ben Fisher and has been prepped for a repaint. The glazing was removed and roof (in one piece) separated. This is a great model apart from the unusual livery.
The two full height NWNGR Summer cars had low lamp tops added…
and long bowsider No. 20 had vents added above the doors – a very tedious job as they are so small! 6 per side.
The zoo car, bug No. 1 had its mesh soldered on. I think this looks great.
and NWNGR brake No.1 had lamp tops added and truss rods (not visible in this shot) added too.
Finally car 1000 (ex FR 100) had its roof soldered on and end domed section created in filler.
There remain 5 sets of truss rods to add on some carriages and also some work to consider what details need adding before painting on K1, the two funkeys and 87.
Still lots to do!
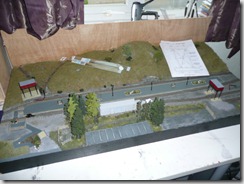
Here are some images in as close to natural light as possible of the station board. There remains a number of details to add, not least the water tanks plus various notices etc but the general look is now there.
The container now has electrified track into it and it’s doors back on. There has also been a little reballasting around the platform edge that has yet to be coloured with sleeper grime.
Last night I also spent a long time measuring the backscene exactly so that I can design the backdrop to be printed…
Last night I moved the station board into the study for final detail to be added such as the water tower strapping (hence the brass wire shown) and the addition of a better container. Ballast was dug out for the container and tonight track will be laid into it and fed. Then the new board joins between this board and the yard board will be set up and the 4 floating rails on the yard board will be soldered to copper clad.
I have also set a date with Dad for the first all-day mega painting session which consists of me taking a day off work and creating a production line for the mass spraying of carriages as follows:
- cleaning and preparation
- grey primer
- body ivory (except roof)
- chassis matt black
- panelling red (leaving windows ivory)
[obviously this example is for the saloons and is different for other vehicles such as the Pullmans and Col Stephens stock etc]
Not all carriages will be able to be finished in one session by any means but a proportion are already at the primer stage so they may be able to be finished, whereas others will only make it to the primer stage.
Final detailing (to be finished by me at home) once the final livery is complete will include glazing, the installation of seated people and tables, couplings, vac pipes etc
I have now attached the ducting to the extractor. I gave up trying to attach the face plate by the bolts and used duct tape instead. It works fine and will hopefully rid my office of a good proportion of the fumes caused by spraying/airbrushing.
I also converted a farish 08 chassis to dcc (using a ztc 255 decoder). However this caused much in the way of headaches until I fiddled with the pickups and set the PWM on CV 9 to 120. It now works ok at low speed (with the pwm at default the loco would hardly move) and now needs running in and weight (a white metal loco body plus some lead should do it) to really perform. Thus the farish warship chassis (also pictured and far easier to DCCify as it has a 6 pin socket) was used for layout testing.
After some judicious bending of point blades and the swapping over of one frog feed (I had connected it the wrong way around), I am pleased to report that the yard board works well. However one of the hoffs is not switching the polarity of the frog correctly and so this will need to be replaced. I may replace it with a tortoise! My multimeter set on AC reports 21v in all areas and 0v between the frog and the next iso joiner where the point is set against the direction, which is correct. However at the problem frog both sides get about 8v! It is believed to be a problem with the polarity change switch getting stuck and not throwing over correctly. It works fine in the other direction.
My brother and I were also able to sort a problem with one of my cabs which seems to have become reset somehow and wasn’t responding. The system menu needed changing to alter the total number of operational cabs to 3 and the cab I had to number 2 (it was set as 99 and thus didn’t work). A slightly bizarre thing to have to do, but it now works again so all is good.
I also laid a second track on test track so that I can easily swap between live testing and the program track. This has already been useful in sorting out the problem with the 08.
The rest of the weekend was spent putting up gates on the drive, planing and installing a new door for my study, installing a kitchen extractor and fan cabinet and with my brother erecting my old sky minidish to receive freesat and thus get the world cup and wimbledon in HD (if I manage to fit in viewing time around the layout!).
Here’s the buffet car interior inside the body!
and today by post a few interesting things arrived – isopropanol for track cleaning (my local chemist doesn’t stock it, but yours might.) It’s basically 99.9% alcohol.
Also in the post was ducting and a wall plate. This is to be used to convert my paint fumes extractor to blow the fumes out of the window rather than recirculate them minus the particles. I now need to drill 4 holes in the wall plate to attach that to the back of the unit (where the grille was) and then use some duct tape to attach the 3m hose to the wall plate. Should be easy but then powder coated steel is always fun to drill through!
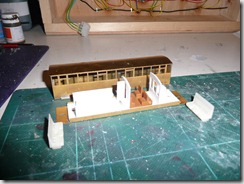
Having ridden in this bad boy over the early May bank holiday gala I just had to model the interior to be a decent replication. I can’t get too excited about interiors however because the average viewer of the model will hardly be able to see it even if they are interested anyway! Mostly this was made up with plasticard, with some of the seats reused from bits I had in my ‘seats’ box. It has come out ok I think.
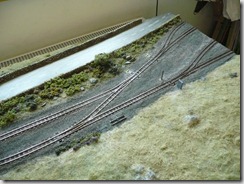
Added the point levers again today and painted them the correct colours of yellow and white. You can also see the completed trackwork, for once there was enough natural light to take this shot without flash.
Progress has been restricted over the bank holiday weekend due to my time being used to build a new kitchen. Even so, some work has been possible:
- The hidden sidings and next door hidden board have been erected in the garage ready for final works to align tracks and finish these hidden sections
- Trackwork on the yard board is finished and has been tested with a carriage bogie for stray ballast on the rails. A few areas will be painted again with sleeper grime following the removal of some stray ballast stones which took the paint with them, but this is a quick ten minute job.
- The interior of the buffet car has continued to make progress with internal partitions created.
- and the major update today relates to lighting. A length of aluminium tube arrived and was duly cut into 5 x 180mm pieces. 5 ikea study lamps have been put together and these slip nicely into the aluminium tube. The tube will be attached to the baseboards via clips that have been ordered and are on their way. This element is now not a concern.
- the key areas of work in the next few weeks are to finally align the boards and finish the hidden sidings. Then the whole layout can be erected and final detailing finished.