Monday, October 30, 2006

moving up a gear

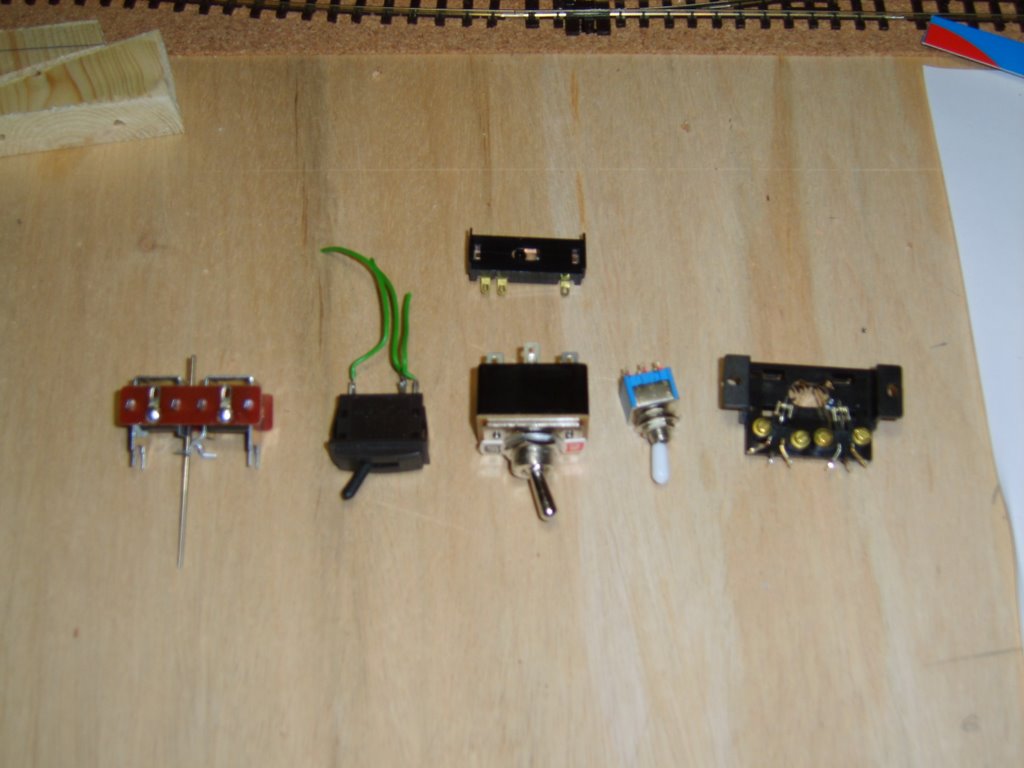
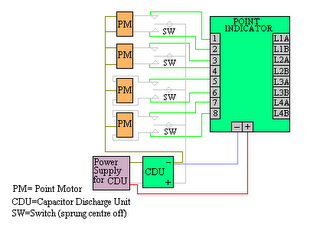
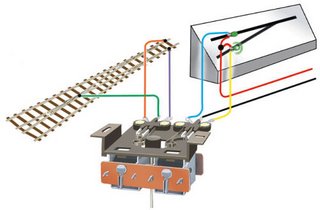
The above are various switches etc. for use on the layout. From left to right: PECO point motor with extended pin, PECO passing contact switch for throwing the points, on-off DPDT [double pole double throw] switch for isolating sections (second poles for an LED on the panel), DPDT centre-off switch with white lever cover (for switching sections between controller A or B, or indeed neither [off]) and finally on the right twin microswitch for loop points, one to switch frog polarity and one for a signal. Behind is a PECO single microswitch for switching frog polarity, where a signal is not present.

Add to these the Din connectors for plugging in the walkabout controllers, the D connectors for connecting wires across boards, the point indicator board and various 5mm and 3mm LEDs and we have all the bits for the control panel, apart from the actual panel itself....


Oh look a control panel! This will be attached using M8 bolts, the top bolts with long washers so that the panel sloped towards the front a little. PS there's 4 layers of white emulsion on this!

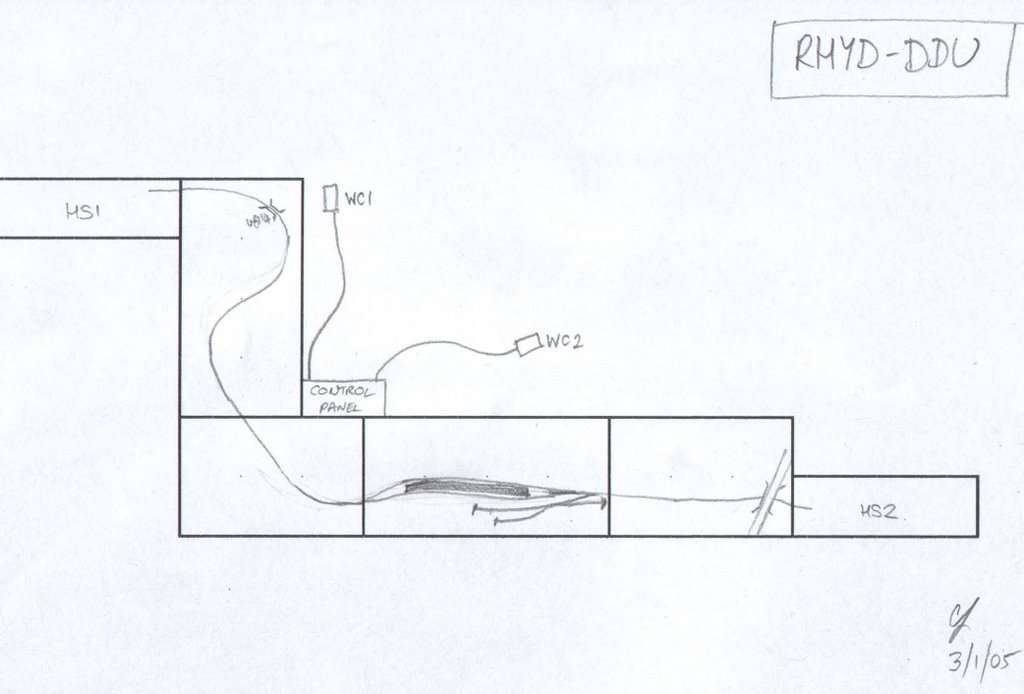
So everything's set up, buzz bars are in place and I even widened the holes in the point bars to take the point motor pins today. It's already for the wiring weekend, this weekend. David and Dad are coming to lend a hand, I'll be spending the rest of the week drawing up wiring diagrams... Bring it on!

Colin

Sunday, October 29, 2006

sticking to it like glue

Good progress today!

- The control panel box has been screwed together and painted with 2 coats of matt white emulsion. This is now ready for the addition of the coloured strips to show the track diagram and then the drilling of the holes to take LEDs and switches.

- Cork was cut out such to mount the two water tower bases at the Beddgelert end.

- 4 pieces of OO track were glued to the bottom of the baseboards to act as 'buzz bars'. I did this using my new glue gun, which takes a bit of getting used to, and the glue dries mega quick!

Colin

Saturday, October 28, 2006

under cover of night...

Had a terrible night last light with the baby, so no real 009 progress to report unfortunately as have been trying to catch up some sleep...

However, I have decided that the next steps should be to get the control panel ready for an intensive wiring weekend before layout work stops for the winter (and I try and get some coaches built!). Thus, I hope that tomorrow I can do the quick bits of woodwork required plus the drilling of the necessary holes... but first let's see how the night goes!

Colin

Friday, October 27, 2006

Hidden (sidings) under a bushel


I want to post today on my emerging plans for Rhyd Ddu's hidden sidings. My feeling is that to keep interest going on the layout, the siding should be able to 'rack up' a number of trains ready to go. This requires a number of sidings, each of which a similar length (garratt + 6 coaches is my standard at 3 1/2 feet). All of this points to cassettes, a sector plate or a traverser.

The necessary baseboards for all these 3 options are actually quite similar, what I am keen to do though is to create a system that is reliable, easy to construct and extendable in the future. My feeling is that cassettes are a bit of a faff to make and that a scetor plate is actually only a less flexible version of a traverser. Indeed, there may well be more than one output from the layout side of the hidden sidings, perhaps into a stabling siding, also not in the public view. Long-term, it might also be nice to extend the layout from the other end of the hidden sidings too.

Another thought is that trains will mostly end up with the loco at the wrong end of the train when they stable in the hidden sidings. Therefore an easy way of moving locos to the other end of the hidden sidings needs to be included.

So...what's the plan?? To allow mulitple outputs from the hidden sidings (both ends), a sector plate is really out and cassettes are indeed a bit too fiddly for me. Thus it look like a traverser, but I have some concerns over using the traditional design where the traverser floats on kitchen drawer runners. Why? - because of the big gaps that are created either side of the traverser that stock could fall into (ouch!).

Thus, I am proposing a slightly different design, where the traverser will 'float' by having highly polished surfaces between the bottom of the traveser and the baseboard top. The traverser still moves easily, but the gaps are gone. At either side there will also be short spurs where locos can be moved onto other traverser roads using push-to-make switches, separate to the actual layout.

So it's traversers here we come....

Colin

Thursday, October 26, 2006

The coaching manual

I've got a decent number of 009 locos for the layout. In the end, I'd like to be able to run WHR(C), WHR(P) and FR trains on the layout, but for now it's looking ok...

However, coaches are a different matter...but this is the plan: red is got kit, amber is part made/in wrong livery, green is complete and grey is 'no kit bought yet'

WHR set 1 - brake, saloon, open, pullman, 23 and B wagon

WHR set 2 - brake, saloon, saloon, open, 24 and B wagon

Works diesel + 2 x B wagons, ancilliary other wagons, coach 1000 and ex SAR brake van

FR 1870s heritage train - bugs 2 and 5, ashbury 10, iron bogie 15, bowsider 18, curly roofed van

FR 1930s heritage train - van 2 (ex No.10), bugs 1,3,4, quarryman's coach, iron bogie 16, bowsider 20

Quarry Hunslet+ slate wagon train and van 6

FR modern set 1 -106(David's),105,104,14,37,26
FR modern set 2 - 116,121,122,103,11,22


So, lots of work ahead this winter to start putting these sets together. Watch this space though...

Colin

Wednesday, October 25, 2006

The B's knees!


This is an ex South African Railways, now WHR B wagon. There are 8 on the WHR at the moment, although 2 are on the FR for use holding coal now that locos are being converted to coal again (Earl of M and Taliesin being the first converted). These are clearly striking and interesting wagons (and sizeable too) and 2 have also been converted into bike wagons to carry bikes (making a nice link with the local Beics Menai hire in Caernarfon). For more info go here: http://www.bangor.ac.uk/ml/whr/wagons.htm Therefore they are a must on my 009 model of Rhyd Ddu. But no one produces a kit for it....well that is until now...

Earlier this year I managed to get drawings of these wagons from Marcus Ingram at the WHR and passed them to Allen Doherty of Worsley Works in the hope he could produce something in 009... Well this weekend at expo narrow gauge the B wagon 009 kit is launched - £13 for a kit with bogies and all bodywork - not bad eh! Allen produces lots of other FR/WHR kits and his site is here http://www.worsleyworks.freeserve.co.uk/NG/NG_Index.htm

Finally, a quick advert for an item I'm selling on ebay to raise funds for Rhyd Ddu (A Corris/early Talyllyn 'Tattoo' loco (no.4)- a good runner, nicely painted and a snip at the moment - see http://tinyurl.com/yfqohd

Colin

Monday, October 23, 2006

At this point in time...


Above, is my first and other 009 layout... It's called 'Nant Gwernol' and a fairly accurate model of the Talyllyn Railway's Nant Gwernol terminus, except that it includes an 'extension', nominally to link to the Corris Railway (which there were once plans to do so) and a slate quarry on a second higher level (where one never existed, the quarries were further up into the hills). There is also an extra siding running to a Dolgoch Falls style water tower [in reality this would be in a ravine!].

A lot of progress was made as can be seen in the photo, but the slate quarry area never really got going (although I had drawn the plans for a scratchbuilt dressing mill) and FR/WHR interests took over from Talyllyn.

From the start of the Rhyd Ddu project I was in two minds as to whether I should rob this layout of parts to help with the costs of the new layout. Well, I managed to avoid robbing anything that is visible to the viewer i.e. track, points etc.

However, today I removed the 4 point motors for use on Rhyd Ddu (to save time, money and some soldering). The other reason for doing this is that I have long admired the modratec ground frame system (pic below) and would love to have one of these on my layout. The reason for not using one on Rhyd Ddu was because you can't use it to power point motors via DPDT switches. Well, on a small one-board layout like Nant Gwernol, the alternative 'wire in tube' method is a lot easier to install and maintain.


So, the point motors and peco switches will be recycled to use on Rhyd Ddu and the other equipment such as the CDU will be sold on ebay. A sad day taking apart bits of one model, but at least it's for a good cause and that I have an alternative plan for the layout long-term....

Colin

Sunday, October 22, 2006

Wirksworth it?

As mentioned yesterday, I visited the Wirksworth show put on by the Ecclesbourne Valley Railway. Was it worth it? Well, there are quite a few things that disappointed me:

- £4 to get in was expensive frankly.
- It was spread across 3 halls across the town, which was just about OK, until it started raining!
- Similar exhibits were not grouped together
- A number of layouts were plain shocking and were no better than a hornby box set placed on a flat board with some shoddy scenery.
- Almost all the trade stands were identical - model shop stands selling OO equipment.

but...

There was a clever little 009 layout made in a violin case, a decent 7mm NG layout and some excellent American and French continental layouts.

so...

One way of considering how good an exhibition was, is to conider how much I spent (or could have spent) and how many layouts that were there, that I would have liked to own. Well, I spent £5 (and didn't want to buy anything else) and there was only 1 layout I would have liked to own. Oh dear!

Next year I hope there will be some better traders...tools, scenery etc... and the bad layouts are expunged...

Colin

Saturday, October 21, 2006

tanks, but no tanks (yet)

Above is the Port end water tower, which is unusual in that the long stock (or KMX tamper) siding runs beneath it. Today I placed the bases of this water tower and tacked all the track in the yard down. The tank will comelater (scratchbuilt) I cut the rails across the board joins and glued down the copper strip sleepers ready for soldering... I also started to consider exactly what parts of the car park will need modelling and to plan for where they fall on the baseboards.

I also received some excellent news from a WHR e-group member a spot height from the top of the Fridd Isaf rocks! [see post yesterday, when I had thought this was impossible]

Tomorrow is the Wirksworth show, so will be there hunting for bargains!

Summary of the future plan:

End Oct - installation of all track, point motors and tidying up of all cork edges around track

Nov-Jan - complete paper wiring plans plus complete control panel (can be done indoors during the cold months, rather than the garage)

Feb-Mar - complete base scenery formers, newspaper, cardboard straps and modroc.

Easter - visit Rhyd Ddu to complete scenic research

early Summer - complete the rest of the board wiring and start scenery.

...

Colin

you tube whr(c)

http://www.youtube.com/watch?v=rl-KjaA5hSc&mode=related&search

worth a look - a youtube video of the Welsh Highland on the approcahes to Rhyd Ddu! The 'layout' starts at 2mins 35secs in!

Colin

Friday, October 20, 2006

On the straight and narrow

Today a lot of the straight tracks alongside the platform were nailed down and the yard point positioned. The rails were cut across the baseboard joins and holes drilled for 2 of the point machines. The final piece of track to the end of the visible layout was also cut and positioned, with a cheeky little curve added to provide some extra interest (although it doesn't really exist in reality).

It has been confirmed that no maps with spot heights of the fridd isaf rocks exist and thus heights will have to be estimated. I have some photos of these rocks with people stood on top, and their height (a nominal 6ft?) can be used to estimate the actual height of the rocks.

Also today heathcote have confirmed that multiple motors can be used with the points indicator board discussed yesterday.

Colin

Thursday, October 19, 2006

Turnout nice again!

Or 'turned out nice again' the classic George Formbyism... With a bit of help from Dad, I laid out the yard today to test the likely layout without nailing it down completely.... The promised images are below...

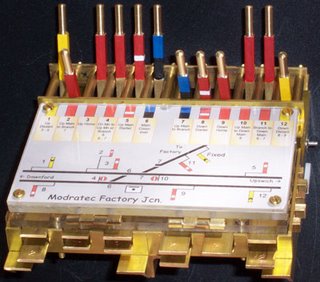
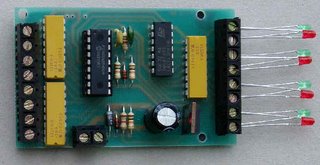
Also today some excellent LEDs arrived from Hong Kong (via ebay). They came in a kit with resistors, shrouds and steel surrounds. This has mean't a step forward for the control panel and extra planning was done today on this. See below for an image:

The LEDs will be used to denote whether track is switched to controller A or B, or indeed off. The final piece of the jigsaw is below:

and this is how it works:

A point position indicator board from heathcote; it remembers the position of the points and displays this via LEDs. Each board powers 4 points; but I have 5! However, two of my points work together at the entry to the yard and so I'm hoping I can get away with one board... I await a reply from the nice people at heathcote....

Colin


Wednesday, October 18, 2006

Derby day


Now the shop pictured above is a bit of a love-hate kind of shop. I'll tell you why.... Firstly, a few weeks ago I dragged the very pregnant wife across Derby, through a rather unpleasant underpass to find this shop. This was a Saturday at about 3pm...I found the shop..........and it was closed!!!! On a Saturday! I now find that the shop is intermittenly closed when the owner is at exhibitions. Which is a bit silly really.....! If I wasn;t so persistent, I probably would have given up and kept on using gee dee in Nottingham.

However, I'm not one to be put off that easily, so today Dad and I attempted a further visit. Yes it was open, yes we found an easy parking space without necessitating a further navigation of said underpass and yes...it's a wonderful shop. Full of woodland scenics, wills, peco etc. - simply very good, bits of 009, all the major model railway equipment required for any gauge and decent prices too...

So, overall, its excellent, if it would be a little clearer about its opening hours!

Purchased the rest of the peco 009 points, a further peco point motor and the first (of many I suspect) bag of ballast (woodland scenics granite mix). When I got home, I glued the final piece of cork in place (hooray Rhyd Ddu is corked!) and laid out the yard quickly to check the positioning of points. So, soon, phase 1 tracklaying should be complete, with just a few soldered joins to complete and some final cork removal before we move on to wiring!

Colin

Tuesday, October 17, 2006

Seeing the light


This shot shows the point indicator on the loop points. These light to show that the points are set 'wrong road' i.e. the automatic sprung points have been set the non-normal way. The FR/WHR system is for right hand running through stations, so this light shows if the points are set for the left hand platform. So how do we get this top work on the layout? Well, the points won't be sprung, but set using peco point motors, I already want one switch to change the polarity at the frog so I need a twin microswitch .... voila below... which uses one switch for the frog and the second for LEDs on the panel, but it's the same idea really...
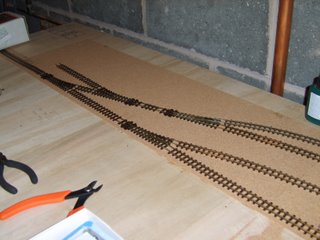
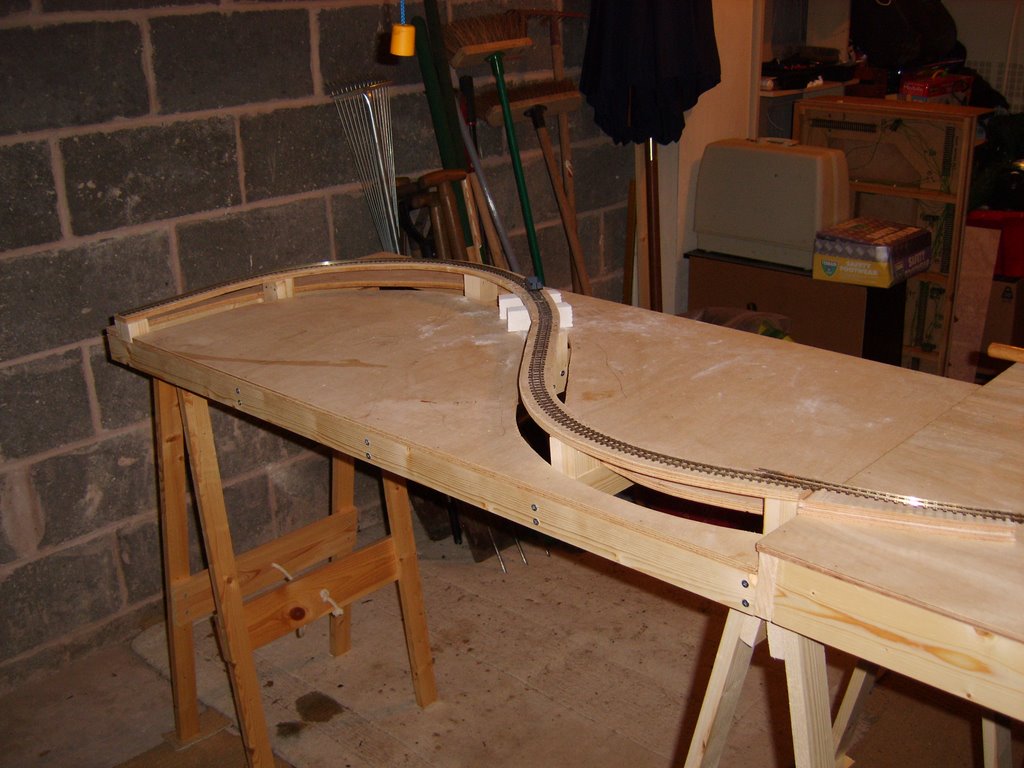
Anyway...progress today has seen the cork stripped out (by chisel) for the platform. which now sits nicely in its gap between the cork for the track bed. Track was then laid out to the south loop point and the final bit of cork laid underneath. The 10mm hole for the point motor pin was also drilled and first ideas for the yard track layout were tried out.

Tomorrow, my parents are here so might not get much done, but the cork will be dry and the yard plan can be sorted and laid out ready for tracklaying.... Will post some pictures when the track is properly liad out and nailed down...

Colin

Monday, October 16, 2006

Give us a wiggle...


The above shot clearly shows the wiggle, which moves left and right from the loop point onto the platform. Why am I telling you this (apart from the comedy headline?), because this has been laid today, along with the track along the north side too and the board joins between board 2 and 3 (to be soldered tomorrow). Then the platform was positioned, marked and the cork beneath it cut ready to be stripped out tomorrow (I started stripping a bit today actually). I also drilled a 10mm hole for the point motor of loop points north.

Colin

Sunday, October 15, 2006

Making the connection


Great progress today. Board 1 has had both its ends connected to copper strip and soldered on for sureity of alignment and a bit of extra security should the ends of the board get knocked in transit. Where board 1 meets board 2 (see shot above) the track was aligned and tested with a lilliput bogie coach.


Then, track was laid down to the north loop point, which was also installed with insulated joiners. Once again the 15" curve is preceded by a transition curve of 18" radius. This is to ease running. Finally, a few further pieces of cork were clued down on board 3 ready for the great platform alignment project (tomorrow?)

PS This post was created using picasa 2, somw rather cheeky image software that is free from google http://picasa.google.com/ and allows you to publish images to the blog directly as well as create web galleries now. But I'm sticking with fotopic for that for the mo - see http://colin-lea.fotopic.net

Colin Posted by Picasa

Saturday, October 14, 2006

And the survey said....


The above is a small screenshot from some wonderfully useful survey data that was compiled for phase 3 of the WHR reconstruction. This was sent to me by the wonderful J.C. Sreeves (him of WHR bridges fame!). These will be really useful particularly for scenery dimensions of outcrops etc.).

Other progress has included endless drilling of tiny holes through every 4th sleeper in preparation for a massive tracklaying session coming soon...as well as the final cork laying on board 2 (the loop point) and some general tidying up.

Tomorrow looks like it could be a day of gardening and some modelling (if I get the lawn mown in a sensible time frame) so we might get some more track laid.

Colin

Thursday, October 12, 2006

At the gates

Spent quite some time today working out the layout of the double level crossing at the north end of the station. It's quite a beast as the image above shows and is basically a road and footpath split crossing at right angles to the main car park. There is also a side gate giving access to the track bed, where the works loco Dolgarrog was stored during phase 3 construction. Having drawn out this crossing, I was able to sort the final curves on board 2 and cut and lay most of the cork there. Tomorrow I hope to be able to finish this off and start pinning down the track. A section of cork for the station was also laid - I decided to lay one large piece (70cm long) and then cut out the unwanted pieces, rather than cut individual pieces to fit.

Colin

Wednesday, October 11, 2006

Quick update

- The next piece of cork underlay was cut and glued onto the downslope(board 2), meaning the final curve up to the loop point can be sorted tomorrow.

- Pieces of copper strip cut into sleepers for the boar joins - the rails will be soldered to the copper for strength at the edges of the boards.

- Half way along the Fridd Isaf curve a couple of sleepers had become damaged, these were removed and replaced.

- More planning was done on the control panel.

Colin

Tuesday, October 10, 2006

Back in control

A little progress and the start of some planning today (although caring for Thomas took up most of the day!)...

Stuck down the three pieces making up the down gradient onto board 2 and started to lay out the alignment on from here. I also managed to measure and convert drawings of the station shelter (pictured) into 4mm scale and found that windows I already have in stock are near enough the correct size (hooray!).

The planning mentioned above is to do with the control panel...I cut out a piece of plywood as a template for the cover and started to plan where switches etc. will be sited. An initial plan has been put together and an order was made for the necessary LEDs (the switches are in stock).

Most of the electronics are thus catered for now, CDU, transformers and controllers are in stock and all that is really needed now are the point motors.

Hope to start cork underlay laying tomorrow....

Colin

Monday, October 09, 2006

A baby boy!!!! Thomas Edward David Lea


Born on Sat 7th October at 16:43, weighing 7lb 6oz a very healthy and totally gorgeous baby boy! Mum and baby both doing very well.

Understandably little progress made on the modelling front!

Colin

Thursday, October 05, 2006

Uses for old quiche boxes


Hi all,

Claire didn't go in to be induced today - it's been put off until tomorrow. Bit of a waste of time taking a day of work therefore, but it did mean that I could get some modelling done alongside a trip to the cinema and garden centre....


Cut up pieces of an old quiche box to create a graduated slope down to baseboard level from the elevated section (see image above for the reason it has to be elevated, to create the wall). Then, following extensive work on the track layout, I cut out a final platform shape, using the initial try as a template, but 3 inches longer and with less curavture at the south end.

Power planers....ummmm...thought my purchase of one ages ago was a bit of an extravagance...but my gosh are they good when you need them!! A quick wizz of the planer alongside the edges and they are perfectly straight now. Great!

Finally, I had time to drill a hole for the plug connection of controller B and then I had to go to the garden centre. Initially I was horrifed to find that the Christmas stuff was on sale already(!), but then I noticed a cheeky little battery operated Christmas trainset. This is the first time I have ever spent £12.99 on a Christmas item in early October, but hey, they might have sold them all by the time I get to this centre again, so it had to be bought (sorry everyone!).

Unlikely to get much done tomorrow as we are likely to go to the hospital am, but I said that yesterday!

Cheers,

Colin

Wednesday, October 04, 2006

Level headed

Mini 'crisis' over! The pier (see yesterday's post) has been reduced in height by 2mm and we have a result - the slight cant issue has been resolved with some judicious packing under pier 2 and the level of the track at pier 1 onto board 2 is now sorted too. Hooray! Then glued together two pieces of plywood (one 4mm, the other 9mm) added a piece of 1.5mm cork underlay and the track level is perfect.

Also purchased a right-hand point for the yard today, completing the S+C requirement. Thanks to Phil Brown, I have also solved the issue of how the yard points will be worked when Rhyd Ddu is commissioned.

Tomorrow, Claire is booked in to be induced, so may get some modelling done am, but then updates are likely to stop for a few days until the baby is home... Normal blogging will be resumed soon...

Colin

Tuesday, October 03, 2006

Ups and downs


Visited Sherwood Models at lunchtime today and purchased some more cork underlay and the first point motor, so I can drill holes in the right places before purchasing the other 4 (and hoping some cheap ones might come up on ebay in the meantime!). The piece of luck however was that in a 'odds and sods' box I found an old LIMA OO flat wagon with a grey container on it. Fantastic I thought, that'll do for the KMX tamper shed! At £2.50 it was a bargain.

Light is fading fast these days and the bulb in the garage isn't really up to it, so I have given up early tonight to concentrate on electrical diagrams for the forthcoming wiring 'month'...(!) I did manage to start the down gradient from board 1 towards the station and I am fast thinking that it might be too steep and that the final pier on board 1 might need reducing in height a little to help. That would be annoying considering I fixed it all on yesterday, but if needs must...it'll have to come off again. The good news is that the cant issue (raised yesterday) appears fine with a bogie coach, so I'll leave that for now and if the pier does get reduced in height it will be even better, so that 'mini crisis' is over!

Right, back to wiring diagrams... and whilst I'm on...have you ever noticed how ridiculously expensive switches are at maplins - try ebay - you can get 10 for the price of 2 in maplins!

Colin

Monday, October 02, 2006

At the end of the pier(s)

All 6 piers completed today, screwed in place and the track bed attached with nails. UB114 piers also sorted to the correct height. These just need to be glued in place now (but still awaits the polyfilla to be completely dry). Claire finished cutting up the weetos boxes into strips for the scenic base. Then the 2 x 9mm ply section of the next board was jigsawed out. This now needs to be filed down at one end to create the down gradient to baseboard level again...but that's for tomorrow...


Slightly worried about a bit of superelevation that has presented itself on one of the curves, but it's not too bad and could be sorted by packing the pier (now) or packing the track (later). Not too bad though so it might be ok, will try it with a train asap. There is also a decent gradient coming out of the hidden sidings...it rises 10mm in 400mm i.e. 1 in 40! which just happens to be the max gradient of the real railway!

Colin

Sunday, October 01, 2006

Pier pressure


Further good progress today. The wing walls of UB114 (pictured with my wife under it) have been cut down to the correct height and all the 7 piers for the Fridd Isaf section were then cut out and the first one screwed into place. The others await the drying of the filler (still not dry from yesterday!).

I also created the bases of the water towers from 9mm ply and used these and various bits of track to approximate the trackplan. This also involved nailing the WHR rhyd ddu plans to the garage wall as an easy way to check them whilst not using the layout as a table all the time!

The good news is that the platform can be longer than I first thought and will be just short of 4ft, which equates to a garratt + 6 saloons!! I also appear to have all the points I need, but need to consider whether a RH point is actually required in the yard, or whether a LH will do, used mostly in the divergent direction.

Looking good! Tomorrow I hope to glue down the piers of UB114 and screw the rest of the piers in before starting the transition structure (2x 9mm ply then sloping down to baseboard level and curving left towards the station approach... Fun indeed.

Problem ahead is how to approximate the height of the Fridd Isaf rock outcrops??? one contour on my map but is that 10m or 19m???

Colin

Principles

A recap over some of the guiding principles for the layout that were first posted on my initial blog site at yahoo:

- I will use commercially available trackwork (PECO), even though the gauge is technically wrong (2ft 3", rather than 2") and the sleepers are wooden style rather than SAR metal. This is beacuse I am much more interested in the overall effect of the layout, rather than the utmost detail. I believe time spent messing about with gauge could have been much better spent building more locos or getting the layout finished sooner. Also it means that other people's 009 locos/stock can use my layout too - a big downside to finescale (8mm) modelling.

- There is not room to fit the whole of a scale model of Rhyd Ddu in my garage or a sensible space at an exhibition, so it's a case of chop and cut where necessary to fit, whilst maintaining the look of the real thing. Although the layout will be firmly based on plans received from the WHR, if it looks right, then I'll do it, even if its slightly wrong. For example, the platform is 3ft , whereas a scale version would be 8ft long!

- I want to give an impression of the isolation of the general site and therefore the baseboards are designed in such a way as to eliminate nearby buildings such as tan-yr-wyddfa at the north end of the station and the toilet block in the car park.

- Trees will be commercially sourced but pruned to as close to the actual thing as possible.

- The water towers and platform shelter will be scratchbuilt to as close as possible emulate the real thing.

- The layout (a pictured above) will eventually have 2 hidden sidings, with two controllers able to pass trains in the loop. I have yet to build these boards and it may be that the Pitt's Head end HS will be turned through 90 degrees, which will require a smaller 2ft square board with a curve to bring the track around and into the HS. This would not be visible to the public as it not prototypical. Still debating this....

Colin